The Unauthorized Quick Guide to the FirstNet Electronic Medical Record
 This is meant as a rapid
introduction to using the St. Lukes ER medical record. David Lickerman is maintaining the
complete manual.
Using an EMR is always slower and more
cumbersome than a paper checklist, but it means no more lost charts and order sheets.
And it comes with a cool logo.
This guide assumes you are reasonably familiar
with computer programs, and that you realize that there may be many ways to do any single thing. Feel free to experiment with the
system; click the obvious buttons and menu items, right click on things to find context-sensitive menus, and don't be afraid to ask for help.
If you have any questions, please look at the faq or contact me.
This is meant as a rapid
introduction to using the St. Lukes ER medical record. David Lickerman is maintaining the
complete manual.
Using an EMR is always slower and more
cumbersome than a paper checklist, but it means no more lost charts and order sheets.
And it comes with a cool logo.
This guide assumes you are reasonably familiar
with computer programs, and that you realize that there may be many ways to do any single thing. Feel free to experiment with the
system; click the obvious buttons and menu items, right click on things to find context-sensitive menus, and don't be afraid to ask for help.
If you have any questions, please look at the faq or contact me.
- Log on
-
Open the Citrix Program Neighborhood icon
Make sure the default printer for your computer is set correctly. Citrix sets the printer when you log on, and to change it you have to log off, reset the default printer, and log on again.
Set the default printer with "Printers and Faxes" under "Settings" in the Start Menu. Right click the printer you want and select "Set as default".
 that is on
the desktop or the Cerner folder in the SLH Applications, then open the
Firstnet icon
that is on
the desktop or the Cerner folder in the SLH Applications, then open the
Firstnet icon  . Sign in
with the user id and password you were
assigned (this should be the same as your WebPINS information. If that doesn't work, use your WebPINS user name
[first four letters of the last name, first letters of first and middle names] and "welcome#1"). Click on the
Provider Checkin button
. Sign in
with the user id and password you were
assigned (this should be the same as your WebPINS information. If that doesn't work, use your WebPINS user name
[first four letters of the last name, first letters of first and middle names] and "welcome#1"). Click on the
Provider Checkin button  at the top
of the screen and make sure the information is correct.
Make sure that the bottom check boxes (Available Provider and Available Reviewer) are checked.
at the top
of the screen and make sure the information is correct.
Make sure that the bottom check boxes (Available Provider and Available Reviewer) are checked. - Sign up for a patient
- There are lots of tabs on the patient selection screen; each gives a different view of the ER patients.
For pediatricians, click on the Age header to sort by age (you'll need to click twice to get youngest first). Note the Reason for Visit so you don't sign up for a minor trauma. For adult doctors, sort by Acuity and LOS.
Tabs on the Whiteboard
- Physician
- The most useful tab; includes chief complaint, vital signs
- ED All Beds
- All patients registered and not yet discharged
- Express Care
- What used to be called Fast Track. The beds are numbered ED,22 to ED,24 and EC,01 to EC,04 (for billing reasons)
- ER88
- Patients on the pediatric floor
- Triage/WR
- Patients still in the waiting room
- Departed Patients
- Patients recently discharged
- 12 Hr Patient List
- All patients seen in the past 12 hours
If the DR column has someone's initials, then that person already signed up for that patient. If you want to take over, select the patient and click the Unassign Provider button
 .
.The Acuity column is usually so narrow that all you see is an A at the top. The numbers go from 1 (needs CPR) to 5 (needs vacation).
- Click on the patient you want; the right hand grey box will show an arrowhead
 . Click on the Assign Provider button
 at the top of the window. Your initials will show up in the
DR column.
at the top of the window. Your initials will show up in the
DR column.
- There are lots of icons on the patient listing; you can find cheat sheets in
this document and throughout the ER.
Patient Listing Icons

- Ready for doctor to sign up

- Needs doctor's note

- Doctors note started but not signed

- Doctor's note completed and signed

- Needs to complete registration

- Needs triage assessment

- Needs nurse assessment

- Item is late

- Item is very late

- Allergies not recorded

- No known allergies

- Allergy alert

- A doctor (private or consult) needs to be called

- Admission order written

- Transfer order written

- Discharge order written

- Lab order written

- Medication order written

- Radiology order written

- Careset (diagnosis-related order set) written

- EKG order written

- Respiratory order written
- Write a note
- Double click the arrowhead indicating the patient . The patient chart will open.
- Look at the name of the patient in the upper left hand corner
 .
. - Look at the time button in the top right
 ; this is the time that the information was last
synchronized to the central database. It should flicker every 30 seconds; you can click it to force it to synchronize
immediately. Do this if you did something but it isn't showing up.
; this is the time that the information was last
synchronized to the central database. It should flicker every 30 seconds; you can click it to force it to synchronize
immediately. Do this if you did something but it isn't showing up. - Look at the Save button
at the bottom. Use it often; the system will go down when you least expect and you will lose hours of work.
Guaranteed.
Do not click the Sign button; this will finish the note and you will have to write an addendum.
- There are lots of tabs in the patient chart along the left side. The main one you want is PowerNote ED. That tab
has its own tabs, along the top, one for each existing doctor note and one list of all notes.
To create a new note, click
 and a new tab will appear labelled
Open Note and you can select or search for a template for your new note. See the faq for details.
If there is a reason for visit checked in the middle right of the window and it's the one you want, click OK.
If you want to review the nurse's notes or see the patient first, click Cancel. If you want to choose a new
reason for visit (or add one), use the search fields at the top right or the browser at the top left and double click the
term you want, so it appears in the Reason for Visit: pane. The program will create a reason-and-age-specific note template.
and a new tab will appear labelled
Open Note and you can select or search for a template for your new note. See the faq for details.
If there is a reason for visit checked in the middle right of the window and it's the one you want, click OK.
If you want to review the nurse's notes or see the patient first, click Cancel. If you want to choose a new
reason for visit (or add one), use the search fields at the top right or the browser at the top left and double click the
term you want, so it appears in the Reason for Visit: pane. The program will create a reason-and-age-specific note template.
- Click the Flowsheet tab and select "All Results Flowsheet" on the upper left
 . Review the nurse's notes and the vital signs. You may need to
expand the width of the columns to get all the information, or select the List radio button to the right of the
"All Results Flowsheet".
. Review the nurse's notes and the vital signs. You may need to
expand the width of the columns to get all the information, or select the List radio button to the right of the
"All Results Flowsheet". - Click the Medication List tab and review the patient's current meds.
- Go back to the PowerNote ED tab. If you still need to start a note, click now.
- Once you click OK in Open Note, the note will show up in the PowerNote ED tab. Go down the note; it's pretty intuitive. Clicking once on a phrase circles it (pertinent positive); clicking twice backslashes it (pertinent negative); clicking a third time clears it (not included in final note). Any phrase with === lets you enter a time, date or number; any phrase with ... lets you type your own comment. Any phrase with Scribble or drawing lets you draw; you can open one of a large number of anatomic line drawings from the open menu to sketch on. >> gives you more phrases to choose from; (repeat) brings up the list of phrases again (so you can document, e.g., left and right or different times).
- Double click the arrowhead indicating the patient
- Write orders
- In the note, under Medical Decision Making is Launch orders.... This brings up a dialog box to write orders.
Make sure the lower tab is set to Power Orders. You can use the Search within
option list
 to select the type of order; this will
make your life much easier when you search. Type the first letters of the order you want, double click it and check the details.
If there are required details not filled it, there will be a
to select the type of order; this will
make your life much easier when you search. Type the first letters of the order you want, double click it and check the details.
If there are required details not filled it, there will be a  next to the order. Look for a detail in bold that does not have a comment in brackets and complete it.
When a detail is filled in, it will be listed in [brackets]. If it is correct, you don't need to change it (i.e.
if a blood test source says [blood], don't bother scrolling the list to select "blood" again. Click the
Sign Orders button
next to the order. Look for a detail in bold that does not have a comment in brackets and complete it.
When a detail is filled in, it will be listed in [brackets]. If it is correct, you don't need to change it (i.e.
if a blood test source says [blood], don't bother scrolling the list to select "blood" again. Click the
Sign Orders button
 or
or  .
Depending on the screen, you may have to click the Orders for Signature button
.
Depending on the screen, you may have to click the Orders for Signature button
 first.
The searching is only by first letters, and the orders may be named something you don't expect. E.g., blood cultures are under Culture-Blood.
The orders are not intelligent about defaults. You have to enter the source (blood) for all blood tests, even Culture-Blood.
You may well have to try different names or ask someone to get the item you want. Use Care Sets whenever possible
Medications are a pain. You need to enter amount (the number) and unit (mg, ml, etc.) and route separately.
Nebulized meds are a combination of under Medications (for the medicine itself) and Nebulizer order. Use Respiratory for things like home nebs or PFTs.
"Call Physician," "Transfer Order," "Discharge Order," "Admission Order" are under Patient Care. Use Consults for non-physician consults, like ostomy or lactation."Call MD," is wrong; the secretaries won't see it. Use "Physician Consult (ED Use Only)".
If you want to write more orders, do not click on the bolded and circled Launch orders.... Once it's circled, it means that it's just a line in the note and clicking it will erase it. Click on the last Launch orders...; it should not be circled and that one is the one that brings up the ordering window. The same thing is true of Discharge Medications and Pt. education; if you have done them once, the first one will be circled and should not be clicked; click the last one.
- Care Sets (Prewritten sets of orders), Favorites and Home Orders
- The ER has created sets of orders for common diagnoses, called Care Sets.
In the order window, click the home icon in the top left (
 ).
Select the set that is closest to your diagnosis (the pediatric ones are named "ED Peds") and check the boxes for
the orders that you want. They should have the details set to reasonable ones.
Make sure you scroll through the whole list; some items are checked already. Read the details—make sure the specimen type is correct for labs and the dosing and route are correct for meds.You can right-click on any order and select Add to Favorites... then select the favorites icon (
).
Select the set that is closest to your diagnosis (the pediatric ones are named "ED Peds") and check the boxes for
the orders that you want. They should have the details set to reasonable ones.
Make sure you scroll through the whole list; some items are checked already. Read the details—make sure the specimen type is correct for labs and the dosing and route are correct for meds.You can right-click on any order and select Add to Favorites... then select the favorites icon ( ) to get that order again.
- Write prescriptions
- In the note, under Impression and Plan is Discharge Medications. This brings you back to the
order window.
You now have to do a bit of work to write prescriptions. Click Add in the upper right.
Look in the upper left corner and select Discharge Meds as Rx from the drop-down menu
(
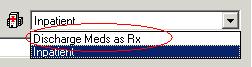 ). Now write your prescription just like any
other order, searching for the name or selecting from your favorites (here called "Ambulatory Med Favorites"; click that folder
to find them), clicking Done and filling in the details.
). Now write your prescription just like any
other order, searching for the name or selecting from your favorites (here called "Ambulatory Med Favorites"; click that folder
to find them), clicking Done and filling in the details. - In the right middle of the screen is the Send To button. Click it and select the printer you want.
- As soon as you click Sign, the script will print out.
- Write discharge instructions
- In the note, under Impression and Plan is Pt. education. This brings up a dialog box to write discharge instruction sheets.
Search for your diagnosis, or browse the list on the left. You have to pick something; there is no blank instruction sheet. The
text is in the lowest pane; click the
 to make it fill the window. You can edit it (or even erase the whole thing and paste your own information in) then click
Print. The program will ask you if you want to write prescriptions. Click No; you did that already.
The program will then ask if you want to fill in the followup instructions.
Click Yes.
to make it fill the window. You can edit it (or even erase the whole thing and paste your own information in) then click
Print. The program will ask you if you want to write prescriptions. Click No; you did that already.
The program will then ask if you want to fill in the followup instructions.
Click Yes. - In the Follow-up pane, search for the name of the followup doctor in the upper left
and fill in the details. If you want to type a doctor not in the database or just "See your doctor",
click the Add Free Text Follow-up checkbox and fill in the information on the right side,
then click the Add button just below the text.
If the name of the followup doctor is not in the lower left pane, titled "Selected Follow-up:", then it was not recorded and will be lost.
- Click the Print.
- The title will be recorded in your note under Pt. education.
- There are work and school excuse forms as well; search for "work" or "school".
- Write an addendum
- If you take over a patient or want to write an addition to a signed note, you create an addendum. Creating a new note
by clicking Add ()next to the Powernote tab.
and selecting the Catalog tab in the New Note pane. In the Administrative folder is an item called
"Addendum," which basically just contains the Medical Decision Making stuff onwards. If you want
a whole note, including H&P, select the Reason for Visit tab and search for the diagnosis
you want.
- Finish
- Discharge the patient
- Under Impression and Plan find Disposition. Click Discharge: time === and where the patient was discharged to.
- Write an order by searching for "Discharge Order".
- Make sure that the scripts and discharge instructions are printed and placed in the clipboard. If you give the patient the instructions, note that the last page is the signature page, for the patient to sign and for you to leave in the chart.
- Sign the note by clicking the Sign button on the bottom. Ignore the stuff about endorsement; that's
if you need a cosignature. If you want to print the note (e.g. to fax to a private) click the
paragraph button
 to
make it more legible and select the Print... item in the Task menu.
to
make it more legible and select the Print... item in the Task menu.
- Admit the patient
- Under Impression and Plan find Disposition. Click Admit: time === and where the patient was admitted to.
- Write an order by searching for for "Admission Order". In the order details, select "Admit to" and search for the admitting doctor. Select "Bed type" and select the item you want (observation, teaching, etc.). You can only put in one bed type. If you need more (e.g. nonteaching, observation, and respiratory isolation) type them in the "Special Instructions".
- Sign the note by clicking the Sign button on the bottom. Ignore the stuff about endorsement; that's
if you need a cosignature. If you want to print the note (e.g. to fax to a private) click the
paragraph button to
make it more legible and select the Print... item in the Task menu.
- Transfer the patient
- Write an order by searching for for "Transfer Order" and type the accepting doctor and hospital in the order details field.
- Under Impression and Plan find Disposition. Click Transfer: time === and the transfer information.
- With the nurse's help, fill out the paper EMTALA form.
- The nurse will copy the note for the transfer.
- Sign the note by clicking the Sign button on the bottom. Ignore the stuff about endorsement; that's
if you need a cosignature. If you want to print the note (e.g. to fax to a private) click the
paragraph button to
make it more legible and select the Print... item in the Task menu.
- Sign out to someone else
- Under Impression and Plan find Diagnosis. Select one, or use Diagnosis code search....
- Under Impression and Plan find Disposition. Click Pt care transferred to: time === and Physician-Search to select the new doctor.
- Sign the note by clicking the Sign button on the bottom. Ignore the stuff about endorsement; that's if you need a cosignature.
Make sure to document in your note that you reviewed all the labs, xrays, etc. in order to get paid. Call the private by writing an order by searching for "Physician Consult" and typing the doctor's name in the Special Instructions field.
Under Impression and Plan find Diagnosis. Select one, or use Diagnosis code search....
Pediatricians should fill out the paper billing sheet.
- Correct a mistake
- Blame someone else; you're a doctor, you never make mistakes.
 I say, that's a joke, son.
- Signed a note too early
- In the Powernote ED tab, click the List tab (if the program asks you permission to refresh the list, click OK). Double click the note you want to edit. You will be presented with a choice of "Modify" or "Correct". Modify brings your note up in a mini-word processor, where you can strike out old text and type an addendum. Correct brings up the whole Powernote window, where you can click on items and change anything.
- Wrong order
- Select the Orders tab. Right-click the order you want to change. Select
Cancel/DC to remove the order entirely. If you want to change it, select either
Modify or Cancel/Reorder (depends on kind of order). You will have to select
a reason for the cancellation and click the Orders for Signature button
on the right center.
- Wrote a note on the wrong patient
- You have to delete the wrong note and start all over again. If you haven't signed the note, select Close Note under the Documentation menu, then Open... under the Open submenu in that menu. Select the Existing tab, select the note you want and click Delete. If there wasn't any data on the note, it will be automatically deleted when you close it.
- If you already signed it, select the Docs tab. On the left-hand panel, open the
Emergency Documentation folder and the ED Note-Physician folder in that and double click the
note. Right-click the note and select In Error Document. The note will be marked as an error, but will
not be deleted.
Do not select Filter In Error Documents; that just hides the error notes, but doesn't mark anything as in error.